Single Sign-On (SSO)
Enterprise-grade feature, only available for customers on the Large plan.
Single Sign-On (SSO) allows your team to authenticate using your existing Identity Provider (IdP). This enhances security and simplifies user management by centralizing authentication.
Our platform supports two primary protocols: SAML 2.0 and OpenID Connect (OIDC).
Prerequisites
Before you begin, ensure you have:
- Administrator access to your Identity Provider (e.g., Okta, Azure AD, Google Workspace, Keycloak).
- Administrator privileges within this platform.
- Your Organization ID (found in our dashboard: https://dashboard.webshotapi.com/organisations#sso).
Configuration
Choose your preferred protocol below to see the specific setup steps.
OpenID
1. Register OIDC Application
In your OIDC provider (e.g., Auth0, Google Cloud), create a new "Web Application" and whitelist the following Redirect URI:
- Redirect URI: you can find your dedicated callback url in https://dashboard.webshotapi.com/organisations#sso in Tab SSO Settings
2. Required Scopes
Ensure your application requests the following scopes:
- openid
- profile
3. Finalize Setup in Our Dashboard
Go to Organisations > SSO Settings and provide the following:
- Issuer URL: The base URL of your OIDC provider (e.g., https://accounts.google.com).
- Client ID: The unique identifier for your OIDC application.
- Client Secret: The secret key generated by your provider.
- Roles mapper: Roles attribute name in userinfo endpoint. If you don't map roles for user, our system will assign minimal privileges for your organisation
- Groups mapper: Group attribute name in userinfo endpoint.
SAML
1. Service Provider (SP) Metadata
To start, you will need our Service Provider details to configure your IdP:
- Entity ID
- ACS (Assertion Consumer Service) URL
- NameID Format: urn:oasis:names:tc:SAML:2.0:nameid-format:persistent
- Required Attributes: ["Email"]
- Prefered Attributes: ["Group"]
- Optional Attributes: ["Role"]
Your dedicated Entity ID and ACS you can find in: https://dashboard.webshotapi.com/organisations#sso in Tab SSO Settings
2. Configure your Identity Provider
Create a new SAML application in your IdP and enter the URLs provided above. Ensure that the IdP is configured to send the user's email address and groups or roles as Attributes.
3. Finalize Setup in Our Dashboard
Navigate to https://dashboard.webshotapi.com/organisations#sso and enter the following details provided by your IdP:
- IdP Entity ID: The unique identifier for your IdP.
- SSO URL (Target URL): The URL where we redirect users for authentication.
- X.509 Certificate: The public certificate provided by your IdP (.pem or .cert format encoded as base64).
Just-In-Time (JIT) Provisioning
By default, we support JIT Provisioning. When a user logs in via SSO for the first time, a new account will be automatically created for them within your organisation.
Attribute Mapping
Our SSO integration supports two methods for managing user permissions: Group-based Mapping or Direct Role Assignment. You can choose the method that best fits your Identity Provider (IdP) configuration.
To correctly provision users, we expect the following claims/attributes from your IdP. If your IdP uses different names, please map them accordingly:
| Field | SAML Attribute | OIDC Attribute | Description |
|---|---|---|---|
| User ID | NameID | sub | User's uniq id in your IdP (Required) |
| User's primary email (Required) | |||
| Name | Name | preferred_username | User's name |
| Roles | Role | roles | User's roles mapper string or array |
| Groups | Group | groups | User's groups mapper string or array |
Group mapping
To manage user permissions efficiently, our SSO solution allows you to map Groups from your Identity Provider (IdP) directly to specific Groups within our application.
How it Works?:
- Define Groups: You can create in our dashboard that correspond exactly to the group names sent by your IdP. For each group, you can assign one or more our internal application roles.
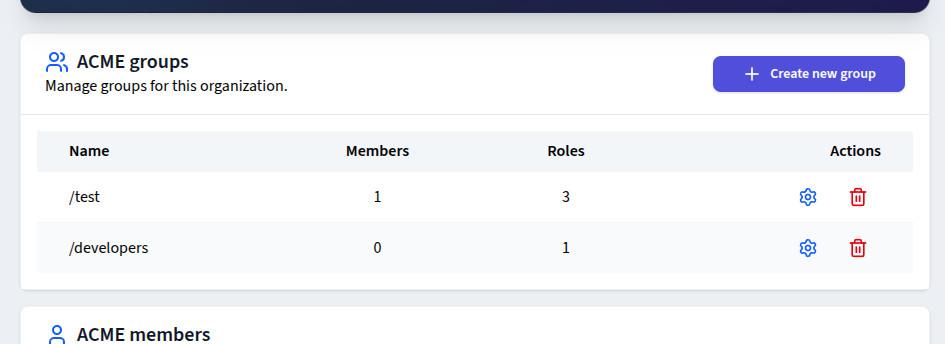
- Dynamic Provisioning: When a user logs in, the system inspects the incoming authentication token. If a group name matches, the user is automatically granted the associated roles for that session.
Protocol-Specific Attribute Requirements
OpenID Connect (OIDC)
The system expects a list of groups within the id_token endpoint.
- Claim Name: groups
- Format: A JSON array of strings.
SAML 2.0
The system looks for a specific Attribute Statement in the SAML Assertion.
- Attribute Name: group
- Format: Multiple saml:AttributeValue elements.
Roles mapping
Use this if you prefer to manage application-specific roles directly within your IdP. If the groups attribute is not provided or if you prefer to bypass group mapping, you can send roles directly. The system will grant the user the permissions specified in the roles attribute.
How it Works?:
-
Define Roles: You can create in our dashboard that correspond exactly to the roles names sent by your IdP.
-
Dynamic Provisioning: When a user logs in, the system inspects the incoming authentication token. If a roles name matches, the user is automatically granted the associated roles for that session.
Protocol-Specific Attribute Requirements
OpenID Connect (OIDC)
The system expects a list of roles within the id_token endpoint.
- Claim Name: roles
- Format: A JSON array of strings.
SAML 2.0
The system looks for a specific Attribute Statement in the SAML Assertion.
- Attribute Name: role
- Format: Multiple saml:AttributeValue elements.
Selection Logic for Groups and Roles mapping
-
If the groups attribute is present: The system matches group names and applies the roles assigned to those groups in our dashboard.
-
If the roles attribute is present: The system matches roles names and grants those roles assigned to those roles in our dashboard.
-
Note: If both are provided, the user will receive a union of all roles found in both attributes.
Troubleshooting
SAML: "Invalid Signature"
This usually happens when the X.509 certificate uploaded to our dashboard doesn't match the one used by your IdP to sign the SAML assertion. Please re-download the certificate from your IdP and update the configuration.
OIDC: "Invalid Redirect URI"
Double-check that the Redirect URI in your OIDC provider exactly matches. Even a missing trailing slash can cause this error.
General: Clock Skew
Ensure your IdP's server time is synchronized with an NTP server. If the "Issue Instant" in the SAML response is too far in the past or future, the login will fail for security reasons.
- Previous
- Contact & Support
- Next
- Blog